
Letter Basket
Tutorial developed by Abbey J. Fedora
Digital design by Abbey J. Fedora

Michael Frederick Halliday, The Blind Basket-Maker with his First Child, 1858.
Basket making was a highly valued craft in nineteenth-century Britain. Useful objects, baskets played a role in transportation, commerce, and occupations as diverse as needlework, fishing, and bricklaying. For women and individuals living with disabilities, making and selling baskets provided opportunities for financial agency. Of particular note are the contributions that blind makers made to basketry throughout the century. Reflecting social realities, Victorian literature and visual art regularly depict blind people as basket makers.
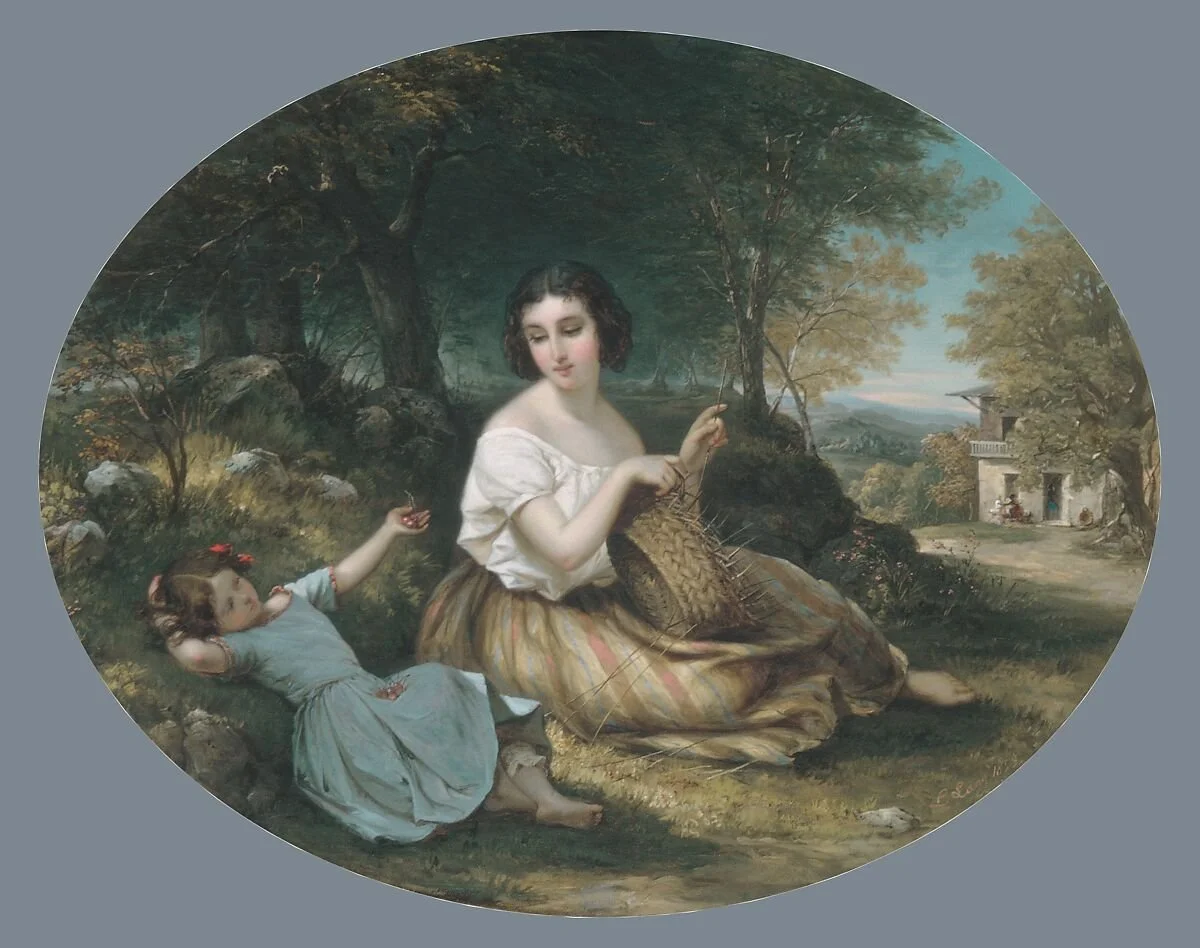
For example, Michael Frederick Halliday’s painting The Blind Basket-Maker with his First Child (1858) features a blind craftsperson as its subject. In Halliday’s painting, the female subject is depicted as reliant on the basketmaker, as she visits his workspace, the place in which he works to provide for her and their child. The basketry supplies that surround the family suggest that the man’s work as a basket maker supports his household. Halliday’s choice to locate the basket supplies on the structural areas of the home, the walls and floor, also suggests that the man’s basket work contributes to the stability of the home. Thus, Halliday’s painting depicts basketry as a practice which not only builds individual agency, but also supports a family.
Not unlike Halliday’s painting, Sydney Curnow Vosper’s An Old Welsh Basket Maker (1900) and Louis Lang’s The Basket Maker (1853) depict basket making as a homey practice, specifically one that occurs in rural settings. Idealizing basketry as a practice which is leisurely rather than strenuous, these paintings forge connections between basketry, home, family, and rural landscapes.

Sydney Curnow Vosper, An Old Welsh Basket Maker, 1900, Cyfarthfa Castle Museum & Art Gallery.
Louis Lang, The Basket Maker, 1853, The Metropolitan Museum of Art.
The basketry materials featured in these paintings are likely willow or reeds, which were the most common basketry materials in the UK. Other materials such as rushes or straw were also used, particularly in coil or lipwork baskets. In this tutorial, you will learn how to make a basket reminiscent of nineteenth-century coil baskets made of dried grasses. This tutorial uses raffia, a now widely available and affordable option for basketry. In the nineteenth-century, this material would have had to be imported to Britain from as far away as Madagascar; straw would more likely have been used.
Robert Stuart Cloustan, Rest After Toil, 1885, Orkney Museum.
Cloustan’s painting Rest After Toil features an example of coil basketry used in furniture pieces.
Coil baskets are made of bundles of straw or other dried materials, which are stitched together with cordage or string to make coiled layers (Heritage Crafts). As Heritage Crafts explains, coil basketry, together with willow baskets, made up a large portion of the UK’s basketry market. It is important to note that coil baskets are not unique to UK-based makers; they also feature in Indigenous cultures across the world, including communities in Australia, Africa, and the Americas. Now that we have some shared understanding of the significance of basketry in the nineteenth century, we can begin making.
You Will Need…
Raffia, dried grasses, or straw
Scissors
A heavy-duty sewing needle
Thread or string
A tape measure (optional)
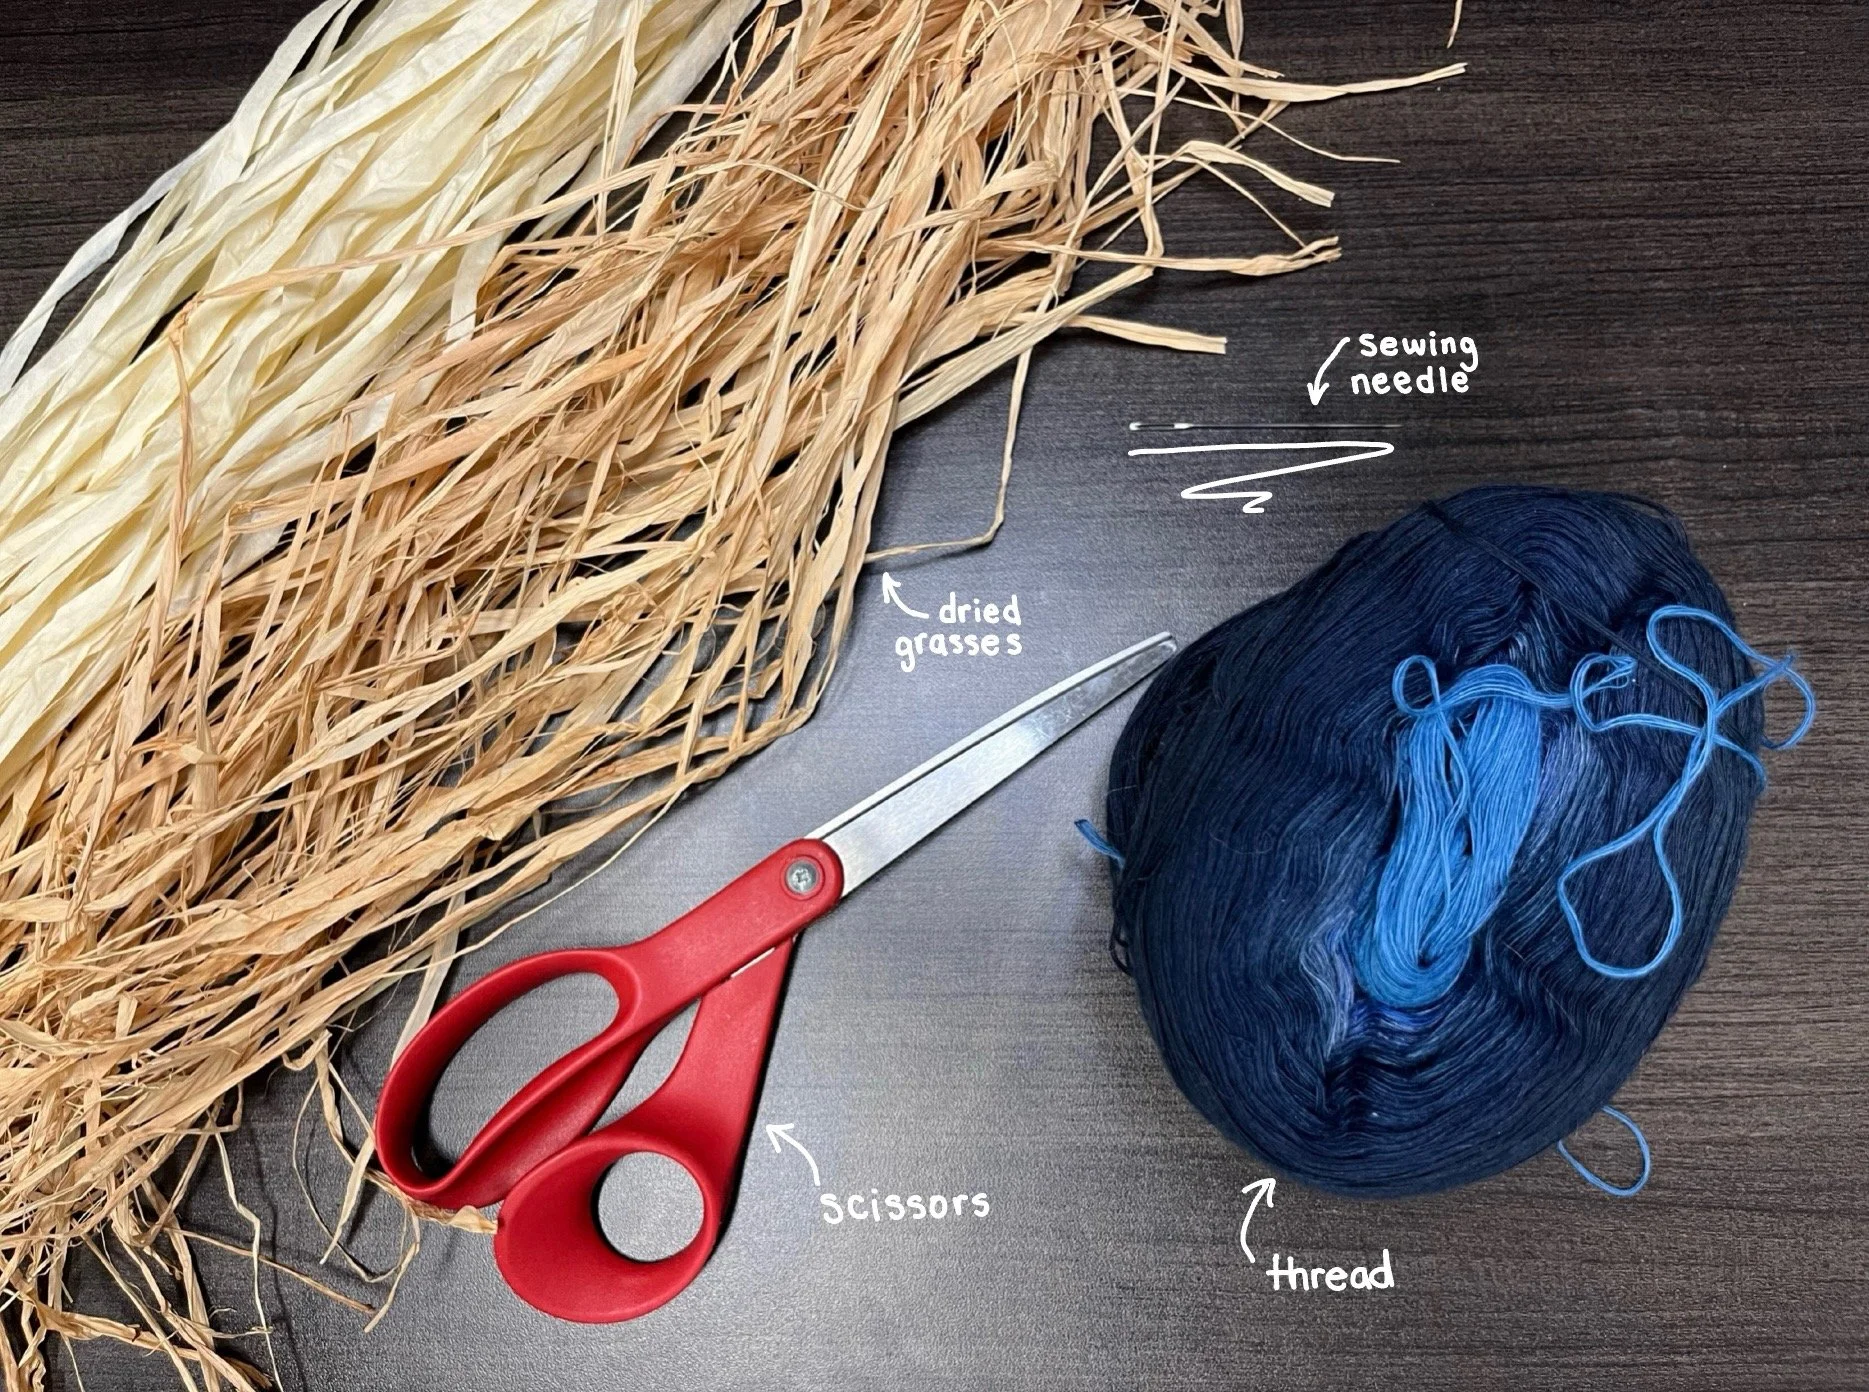
Abbey’s supplies: dried grass, scissors, a sewing needle, and thread
There are two steps you will need to repeat throughout the making of your basket: (1) adding more grass and (2) adding more thread. Before beginning Step 1 of the basket tutorial, get familiar with the following two processes. Refer back to this section when needed.
Before you get started…
When you run out of grass to stitch, gather a new bundle and combine it with the unwrapped grass by placing it on top of the remaining grass.
With the new grass placed on top, incorporate the grass into your stitches (stitch method described in Step 6).
It may take a few stitches to fully incorporate the new grass into your base, so keep the grass secured with your hand for a few stitches until it is fastened.
1: Adding more grass
When your thread becomes too short to make any more stitches, cut a new, long piece of thread.
Attach your new piece of thread to what remains of your original piece of thread with a simple loop knot.
2: Adding more thread
Making the body of your basket
Take a small bunch of grass (less than a handful).
Trim the grass on one end to make the strands uniform.
Step 1: Creating a bundle

A small bunch of dried grass, less than a handful

Abbey trimming the bundle of grass
Step 2: Tying your bundle
Using your thread or string, tie the trimmed end of your bundle.
Keep one end of your thread long; I left mine attached to the skein for this step.

Abbey’s bundle of grass tied with thread on the trimmed end
Step 3: Wrapping your bundle
Holding your long piece of thread, begin wrapping the thread around the bundle. Make sure to pull the thread tightly after each wrap.
Wrap in the same direction until you have wrapped about 4 to 5 inches of your bundle.
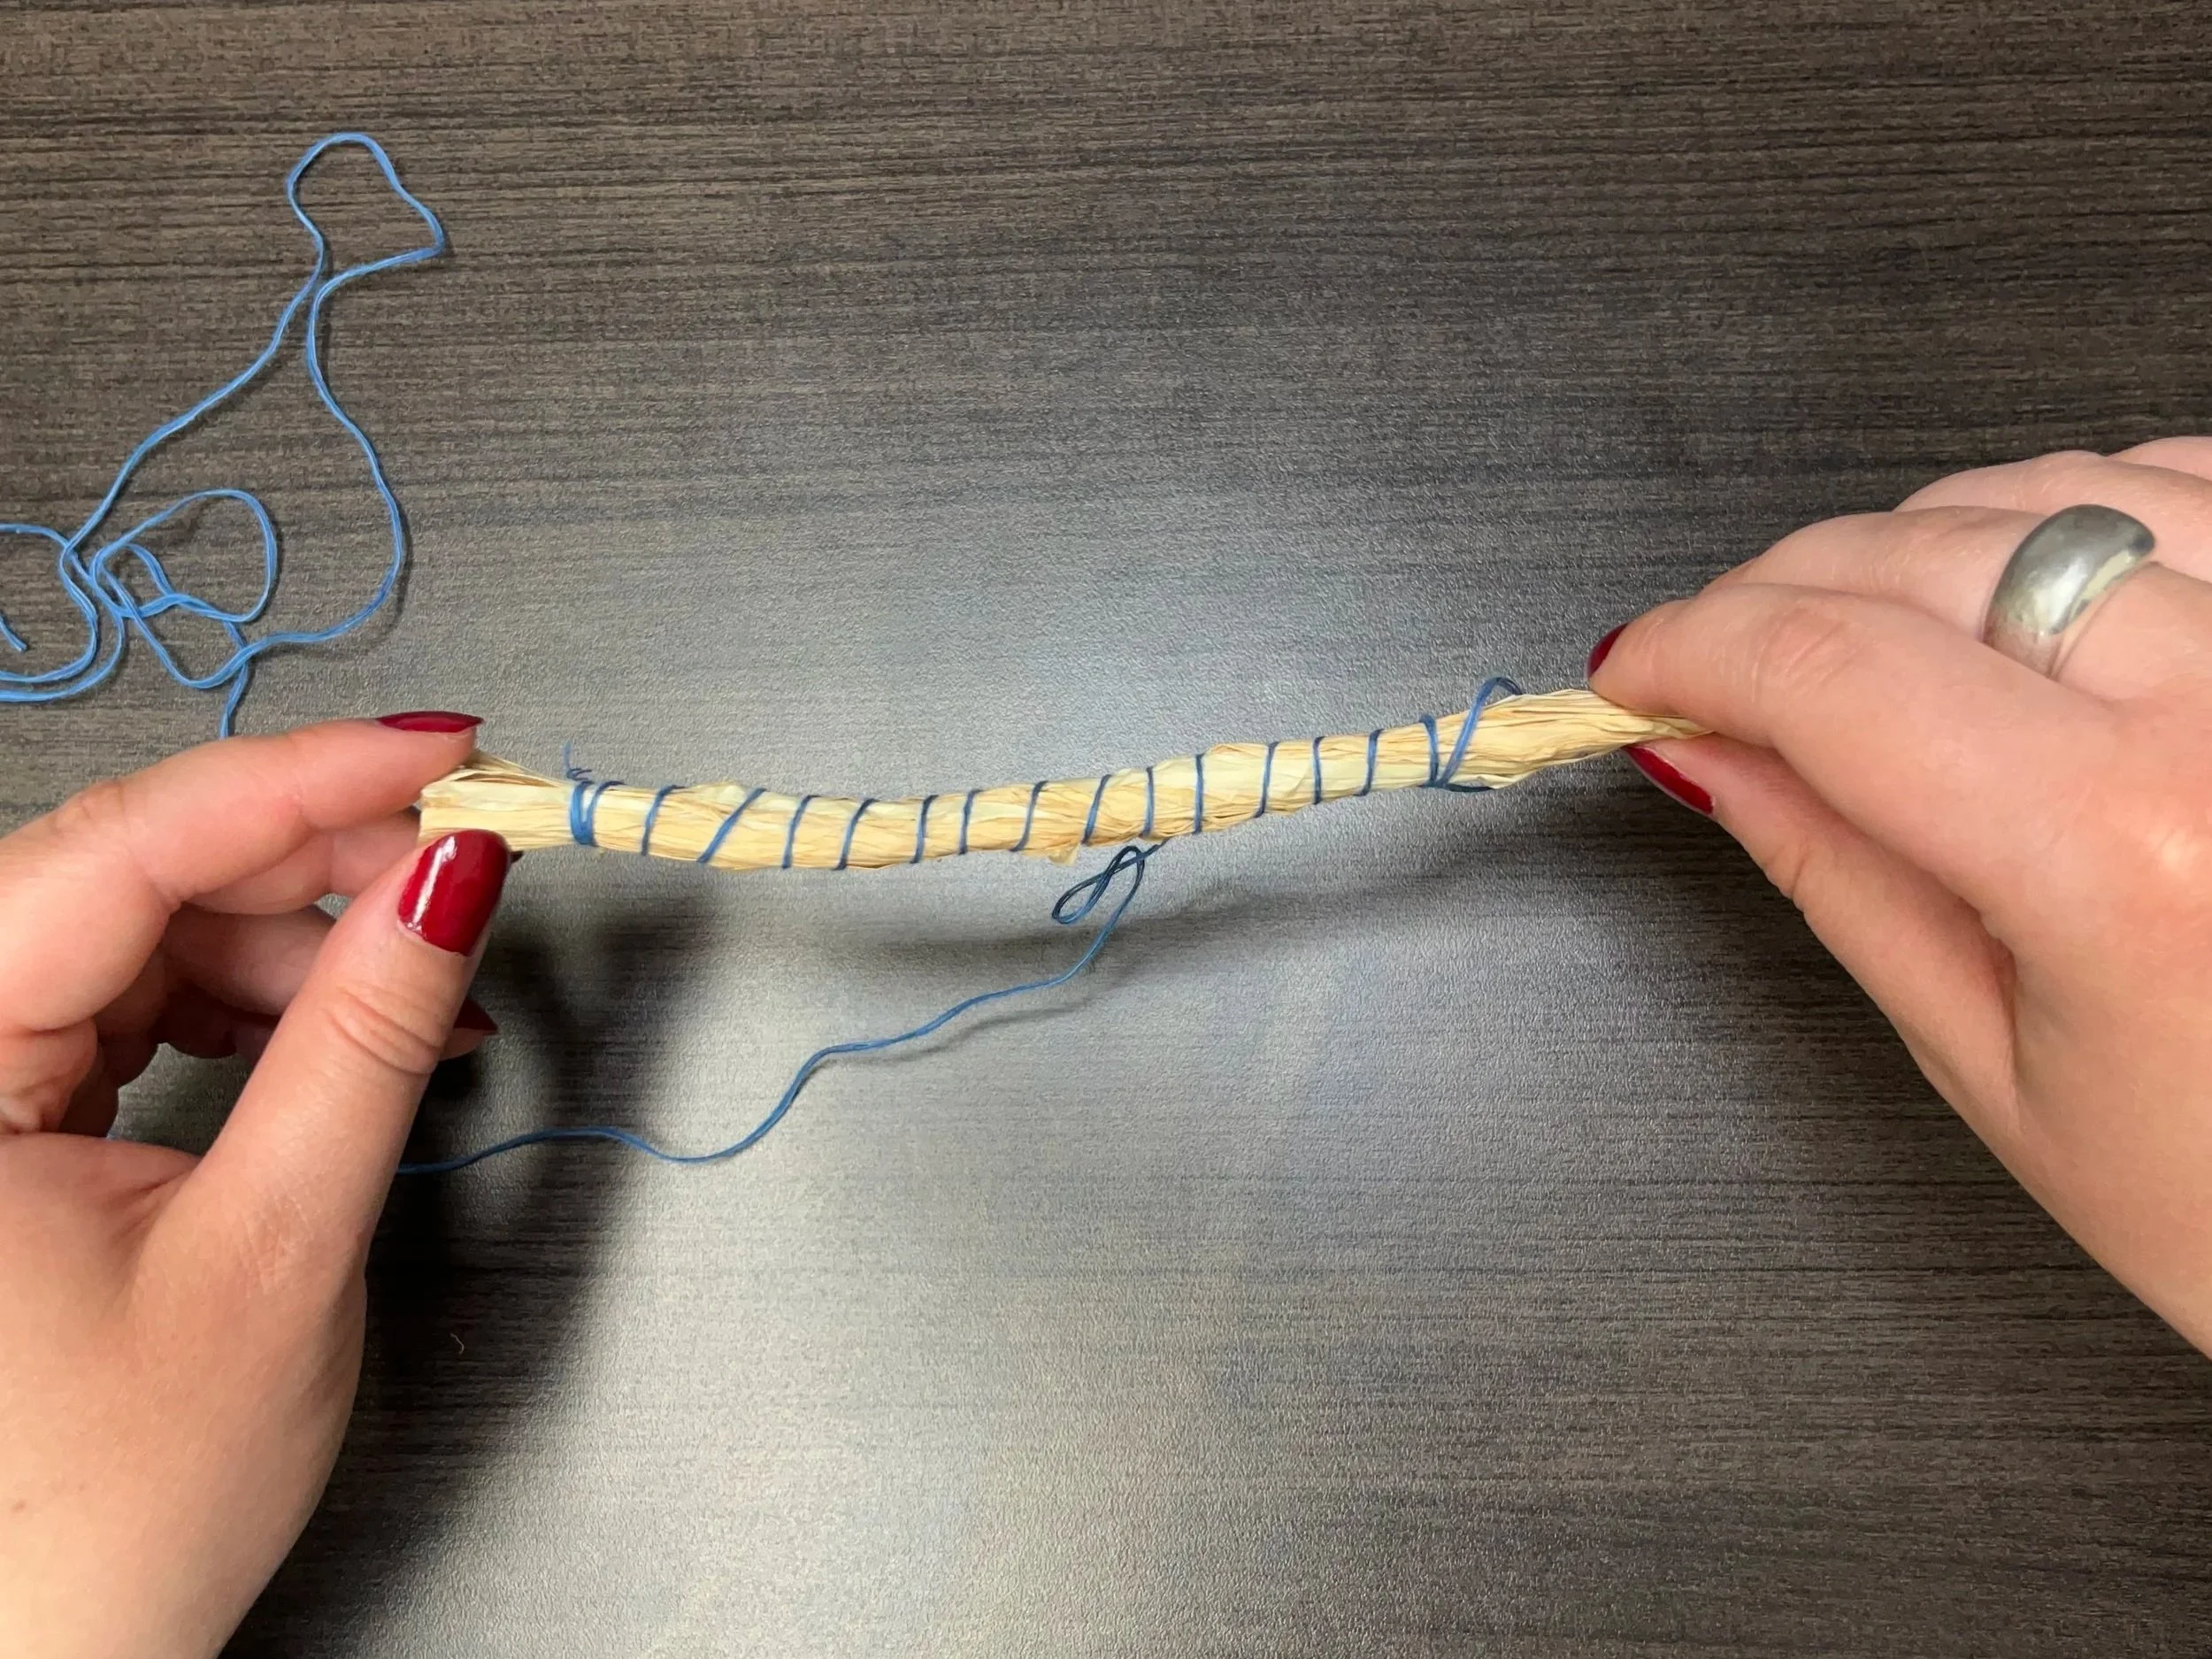
Abbey’s grass bundle wrapped with thread
Step 4: Starting your base
If still attached, cut your long piece of thread from the skein.
Thread the long piece of thread through your sewing needle. Do NOT knot the thread on your needle.
Abbey’s threaded needle with the thread ends unknotted
Step 5: Building your base
After threading your needle, take the unwrapped portion of your grass and fold it alongside your wrapped bundle.
Abbey’s grass bundle with the unwrapped grass folded along the wrapped bundle
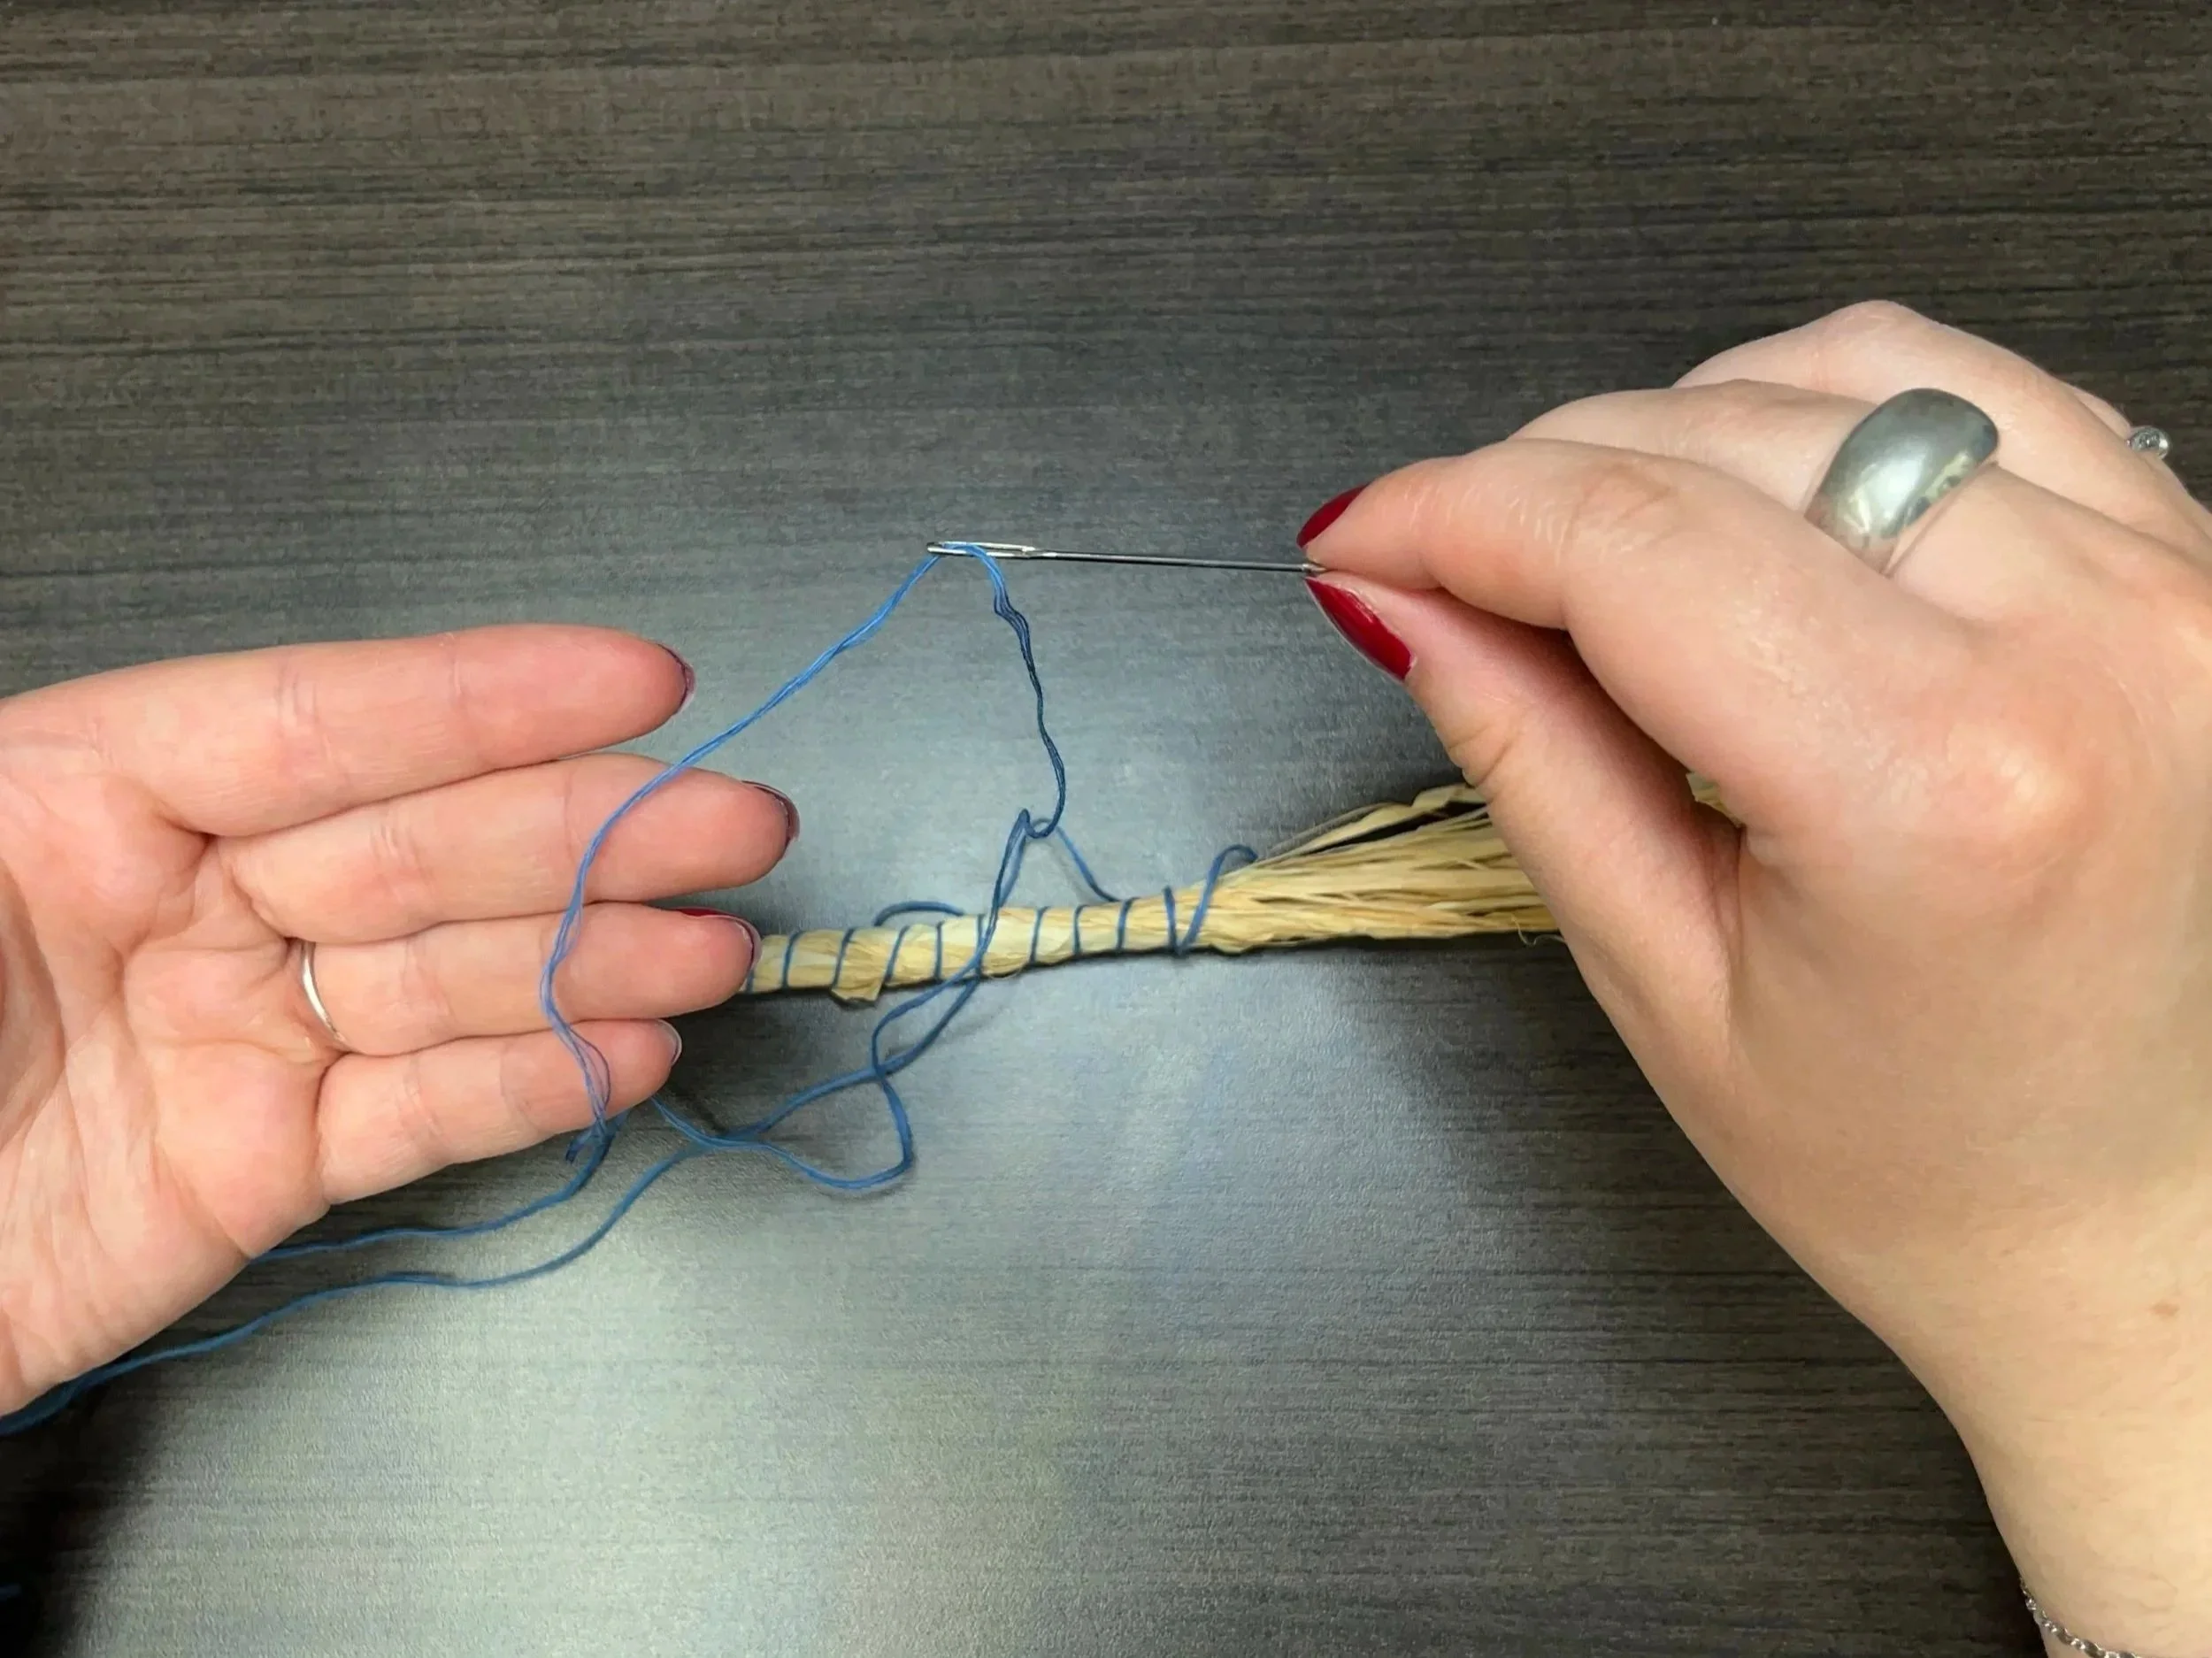
Step 6: Creating layers
Keeping the unwrapped grass in position with one hand, take your threaded needle and insert it into the wrapped portion of the bundle, right alongside the unwrapped material.
Pull the needle through the wrapped bundle and then around the unwrapped grass to insert it into the wrapped bundle again. With this stitch, you have begun the process of binding the loose grass together while also attaching it to already wrapped sections. This is the method you will use to create the layers of your basket.
Making your first layer

Abbey beginning the second layer of the basket base, stitching through the wrapped bundle to connect the unwrapped grass
Continue stitching along the unwrapped grass until it is the same length as your initial bundle.
Once you have stitched the unwrapped grass to equal the length of the initial bundle, you will have two wrapped bundles that are attached.
Fold the rest of the unwrapped grass alongside your newest layer (the opposite way of your first fold, like a zigzag pattern).
Adding base layers
Continue stitching and folding in alternating directions as instructed in Steps 5 and 6 until you create a base of five wrapped layers.
Once you have made a base of five layers, fold your unwrapped grass around the perimeter of your base to create a round edge.
Stitch the round outer edge using the same method you have been using for your folded layers. Insert the needle into the outer edges of your layers to secure each stitch.
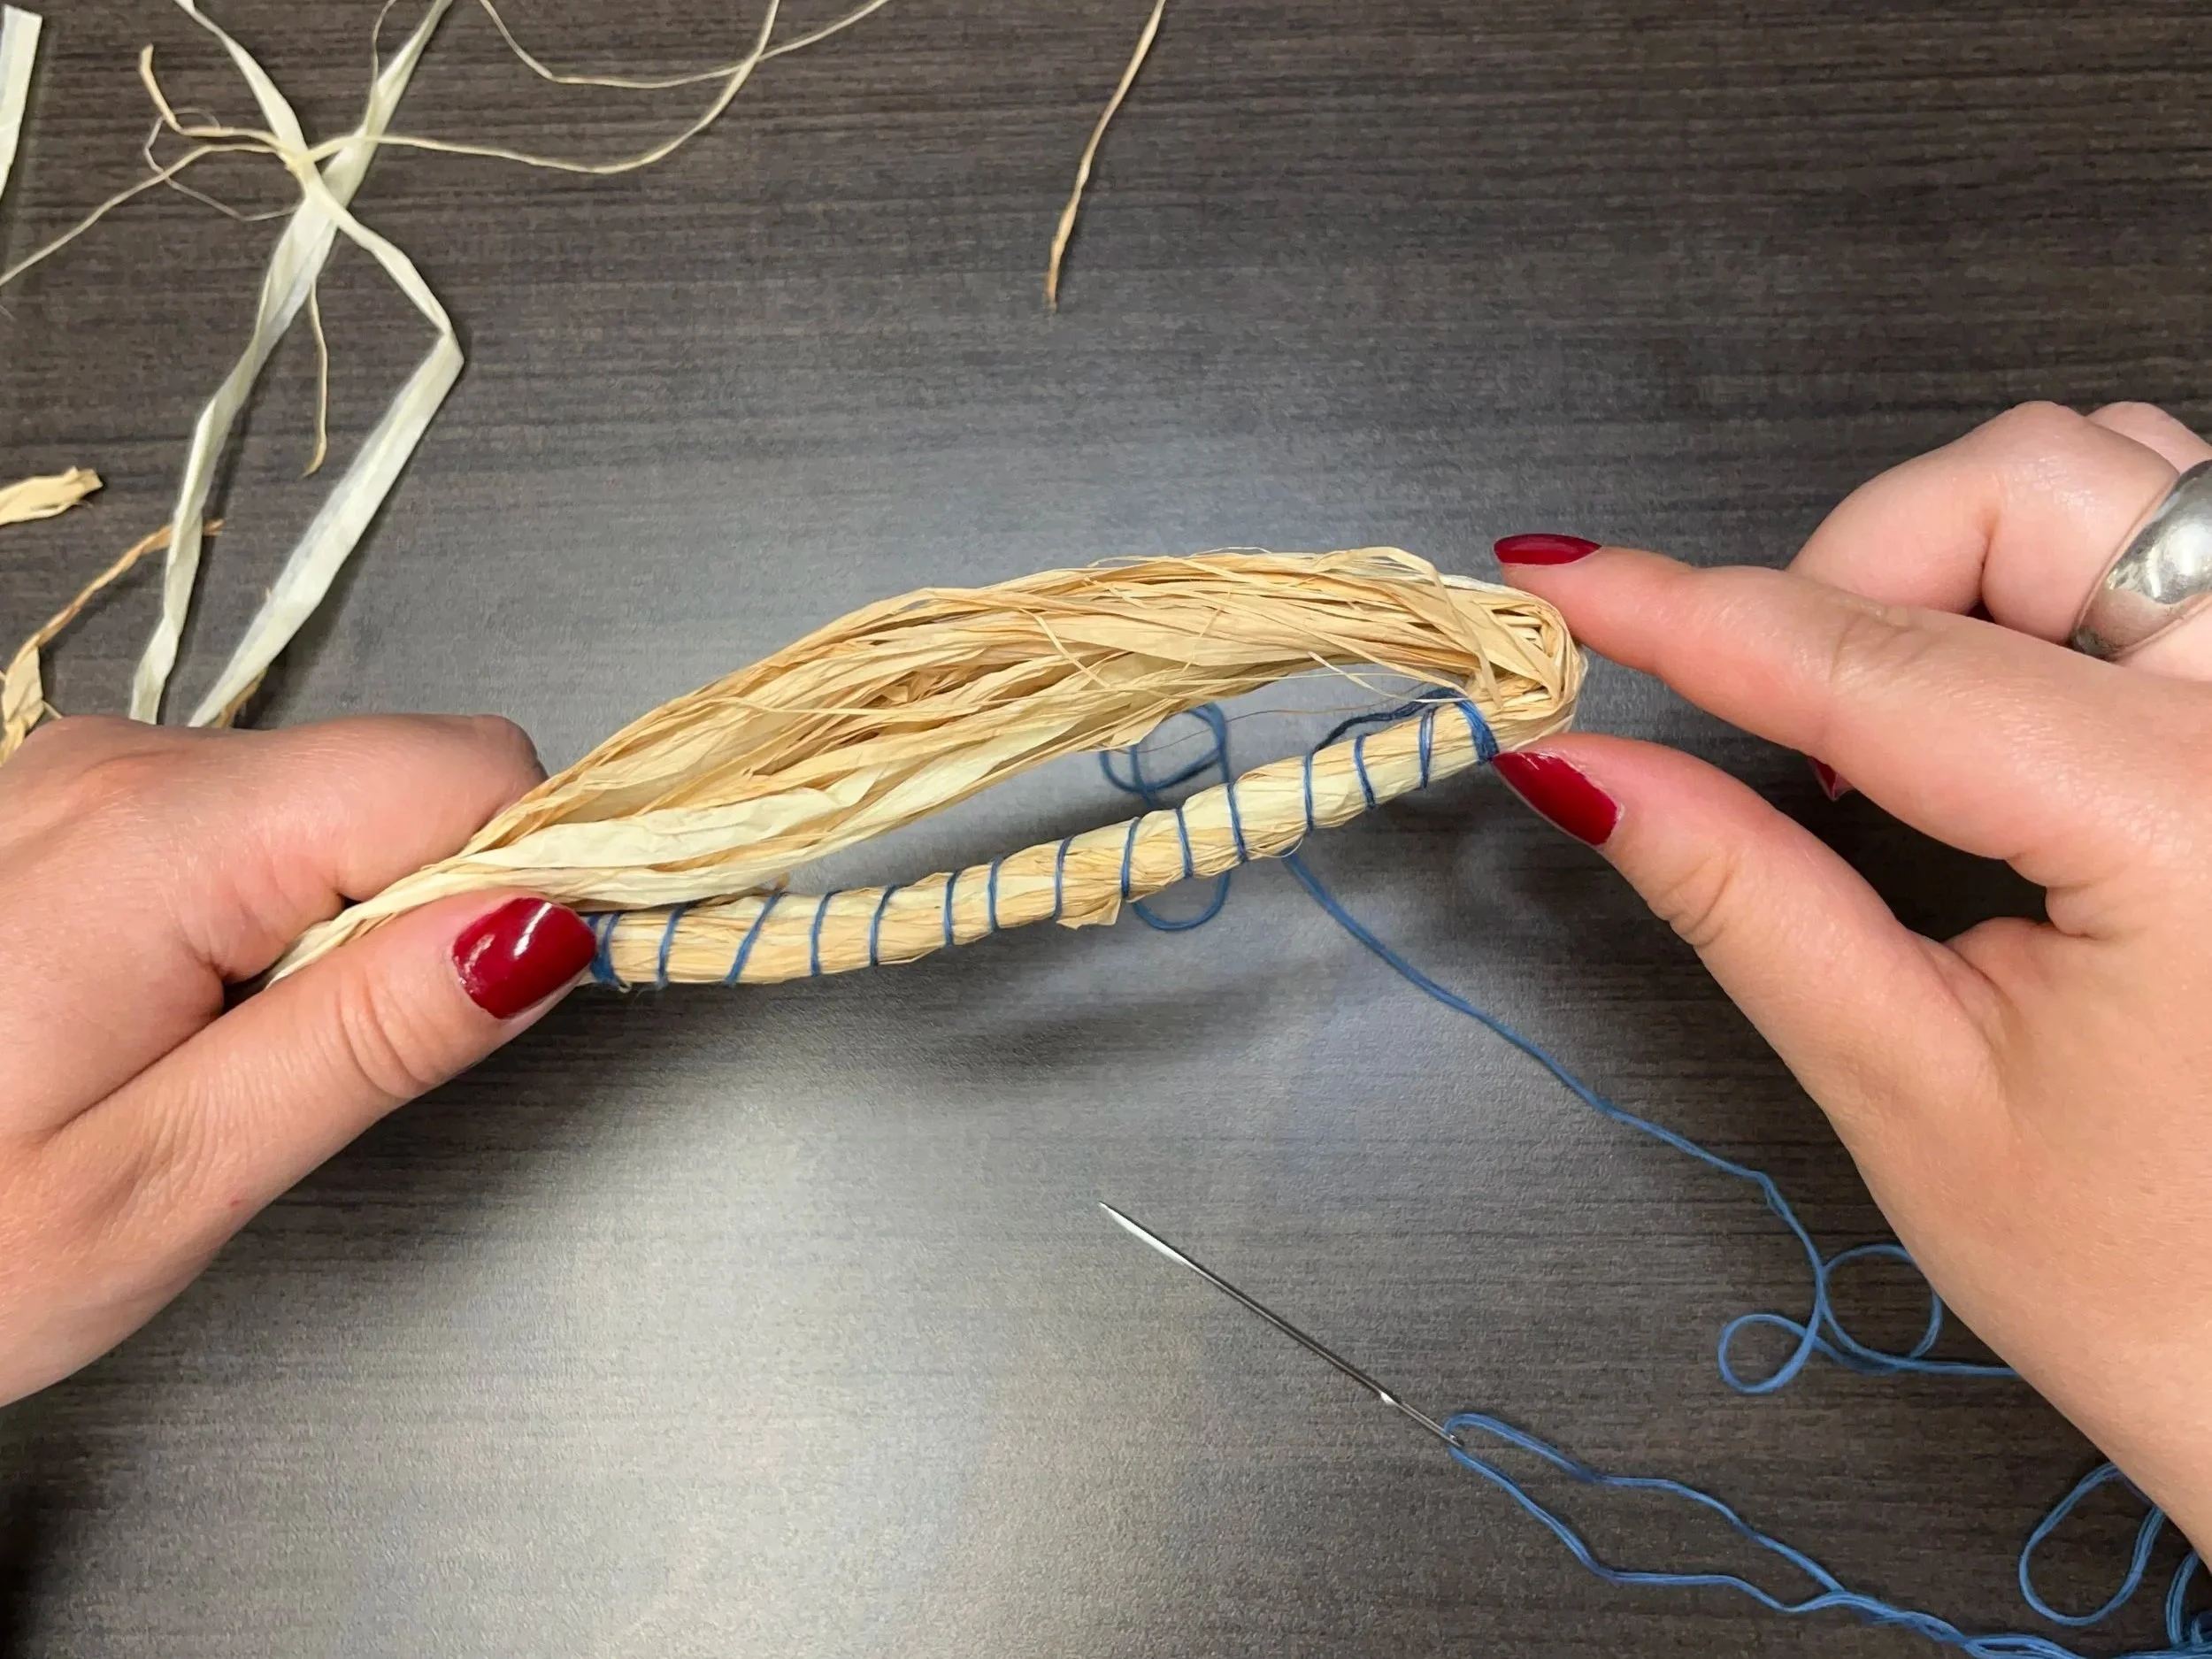
Step 7: Making your base round
Continue folding the unwrapped grass around your base in an oval pattern and stitch it into place until you reach the desired size of your base. Once finished, this rounded section will be the bottom of your basket.
Step 8: Creating the sides of your basket
After you have grown your base to the desired size, it is time to build the walls of your basket. Take your unwrapped grass and stack it on top of the outer layer of your base.
Repeating the same stitch you used to create your base, insert your needle through the top of the outer layer, pulling it through and around the stacked grass to secure it into place.
Repeat this process, connecting stacked layers to the base with stitches, following the round perimeter of your base. Continue stitching vertical layers until the walls of your basket reach the desired height.

Abbey’s basket after stitching four vertical layers
On the outside of your basket, thread your needle through your final stitch and tie a finishing knot. I repeated this knot a few times, incorporating a bit of the grass into the stitch as well to ensure that the ends were secure.
TIP: for more guidance on how to tie a finishing knot, view this short video!
Once the walls of your basket have reached the desired height, add a few extra stitches to your last stitch where you want your walls to end. Pull tightly to secure them.
Step 9: Finishing the body of your basket
Once you have secured the final stitch of your basket, trim the remaining grass.
You have now completed the body of your basket!

Once you have completed these steps, you can either leave your basket as it is, or you can add a handle to create a hanging basket (instructions below).
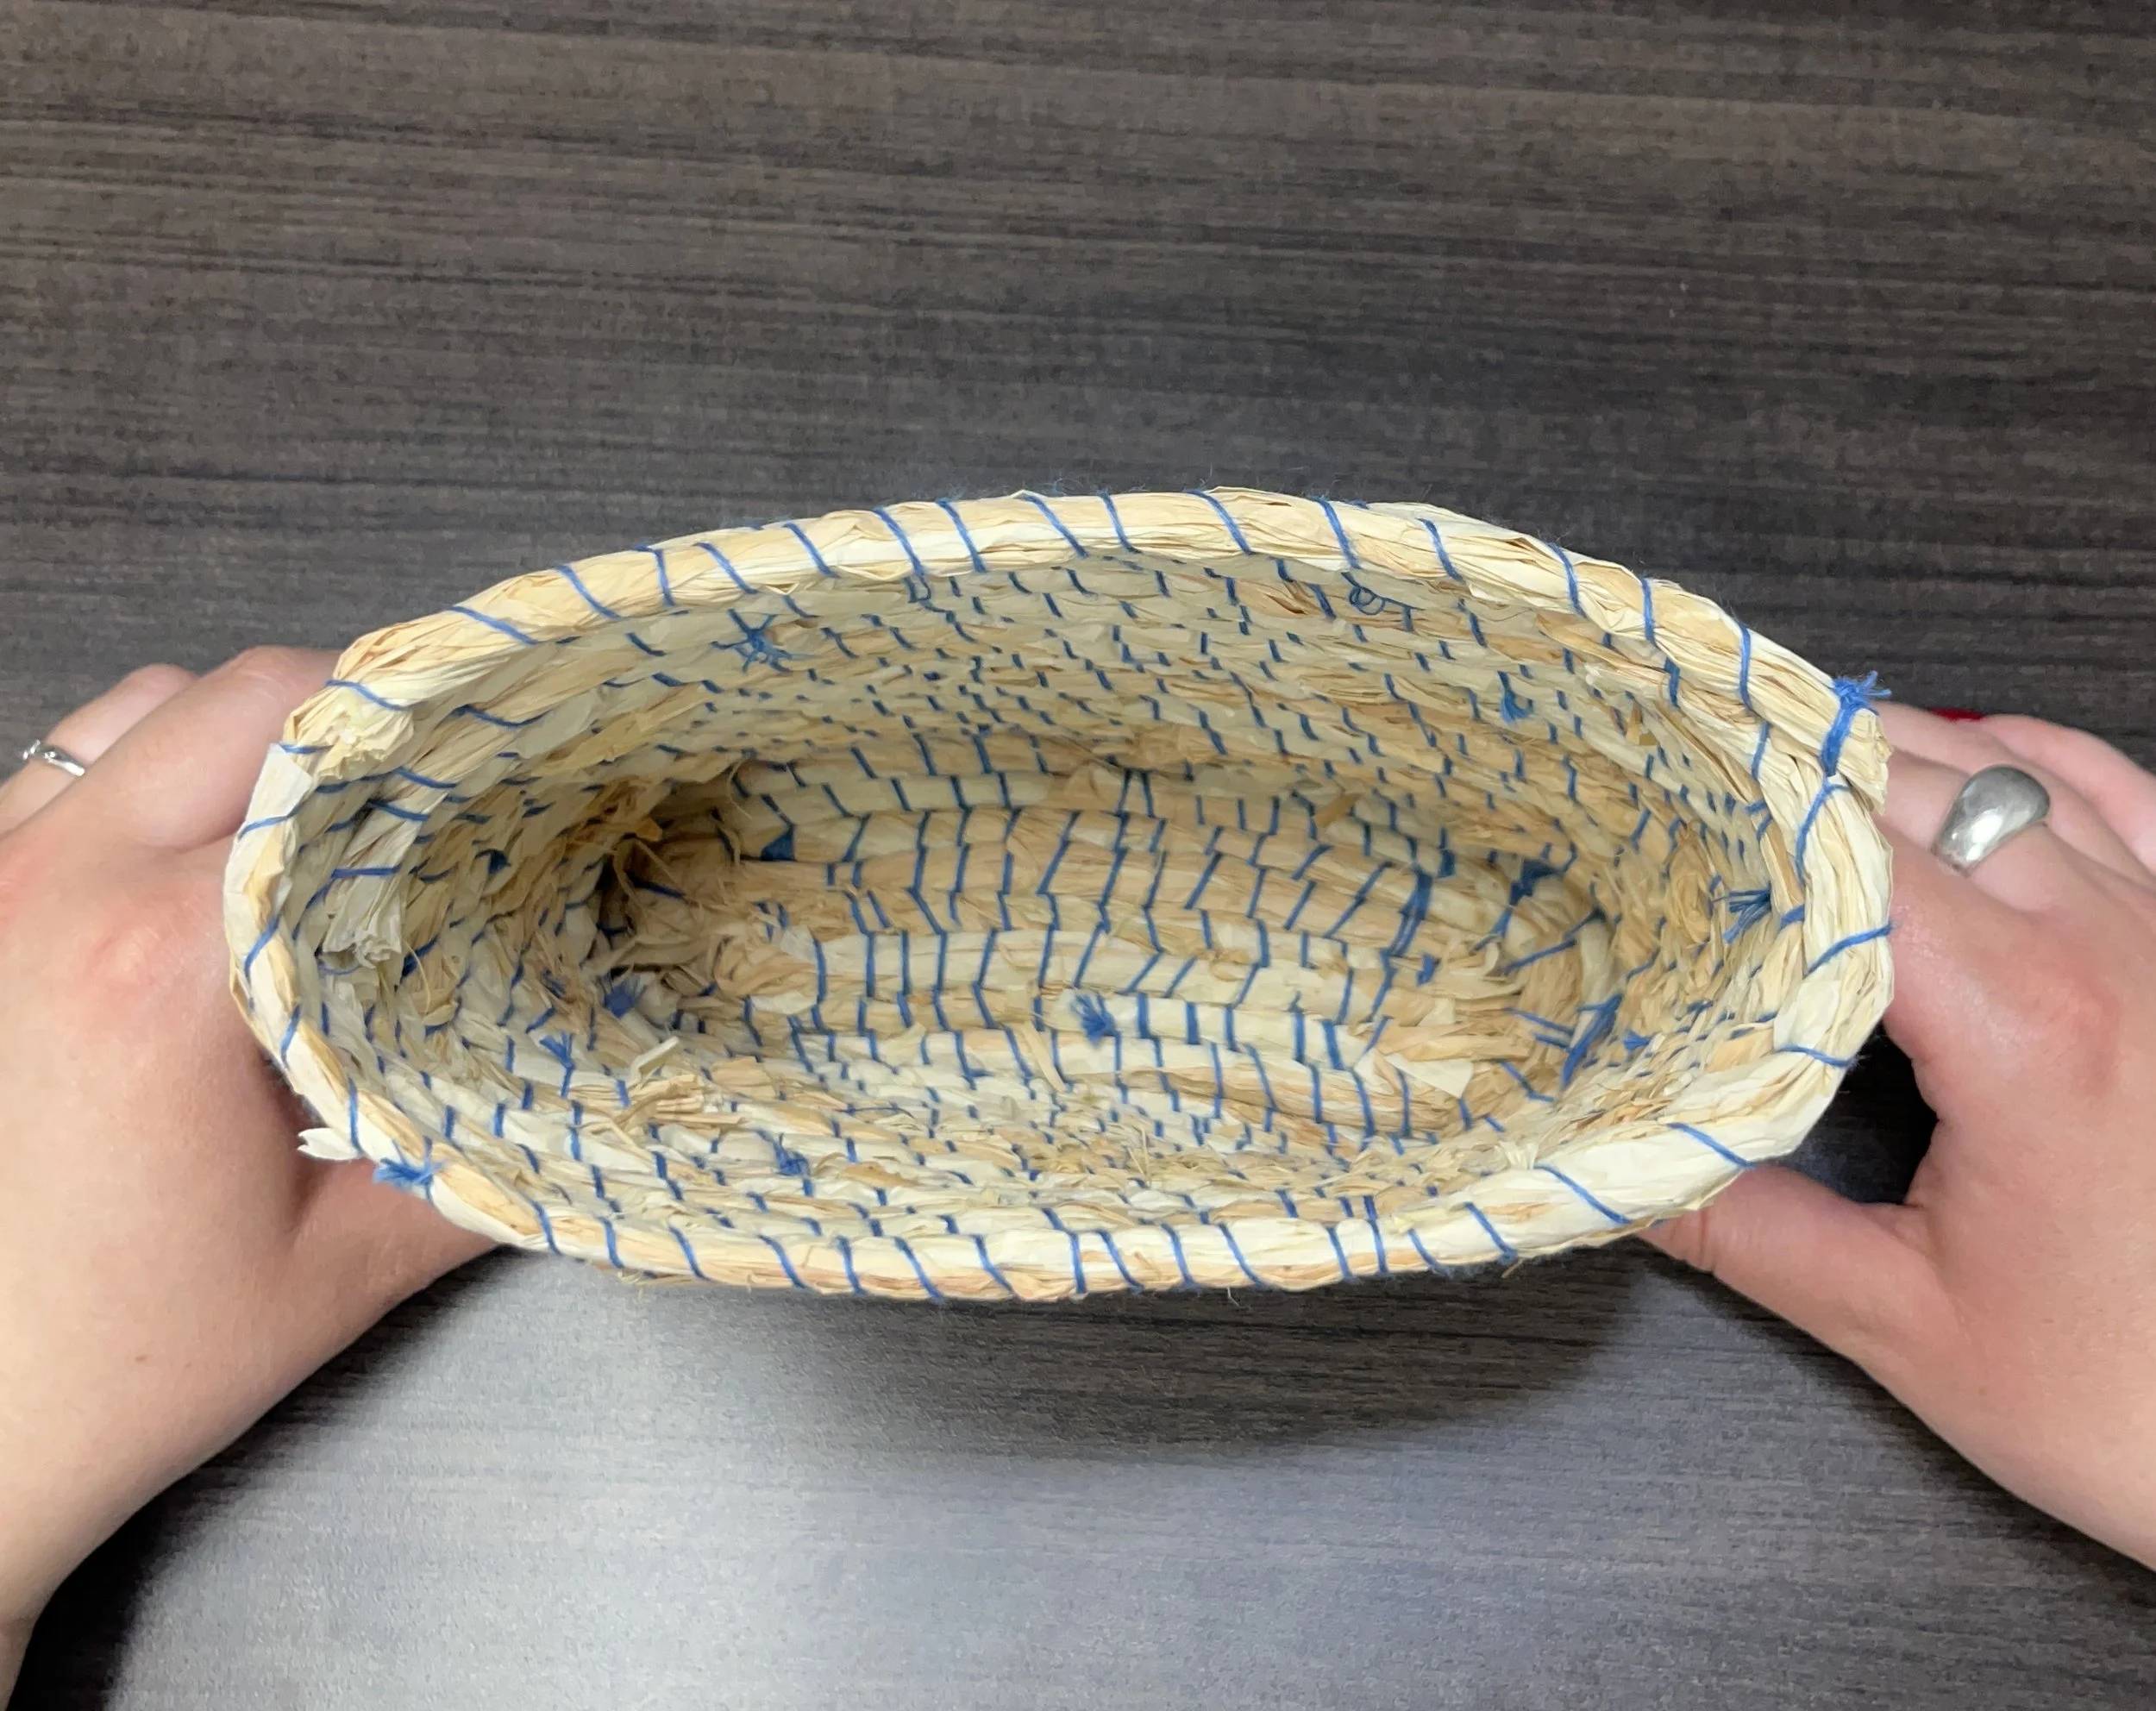
The finished body of Abbey’s basket from the side and from the top without a handle
Adding a handle
Step 1: Starting your handle
Create a new bundle of grass, slightly thicker than those you made for the body of your basket.
Tie your bundle and wrap it the same way as you did for the bundle in Steps 2-3 of the basket body tutorial.
Wrap the handle bundle until it is approximately 10-12 inches in length. As you did with the body of the basket, trim the grass at the starting point of the handle bundle to tidy it up.

Abbey’s new bundle of grass for a handle

Abbey wrapping the handle bundle in one direction
Step 2: Wrapping your handle
After you have wrapped the handle one way for about 10-12 inches, wrap the unfinished end a few extra times and begin wrapping in the opposite direction, towards the tied end of your handle.
Step 3: Finishing your handle
Once you have wrapped the handle in both directions and have reached the tied end where you began, wrap the end a few extra times and make a finishing knot to secure the thread.
Trim the other end of your handle.
Step 4: Positioning your handle

Position your handle on the back of your basket. Secure it with spare sewing needles or pins.
Abbey’s handle positioned on the basket, secured with spare sewing needles
Step 5: Attaching your handle
Starting a diagonal stitch
Thread your sewing needle with a long piece of thread. This time, knot the ends.
Insert your needle through the back of your basket beside one end of your handle.
Pull the needle through. Your thread should anchor itself on the back of the basket.

Abbey inserting the needle from the back of the basket and anchoring the thread
After you have anchored your thread, from the inside of your basket, thread your needle through the basket wall diagonally across from your first insertion.
Pull the needle through.
Making a diagonal stitch in one direction

Abbey inserting the needle through the inside of the basket, diagonally across from the anchor stitch
Continue stitching diagonally, repeating the stitches described in Step 5 of the handle tutorial, until you have stitched around the handle end 4-5 times.
Once you have stitched the handle end diagonally in one direction about 5 times, insert your needle across from your last stitch, beginning to stitch diagonally in the other direction to make an X with your thread around the handle end.
Stitching an X

Abbey making a diagonal stitch on the other side of the handle end (across from the initial stitch) to make an X
Continue making diagonal stitches until the end of your handle is fastened to the back of the basket.
After you have stitched an X on the end of your handle, insert the needle into the thread of the X and tie a finishing knot. You may want to tie a few extra knots to ensure that the thread is secure.
Step 6: Finishing your handle

Repeat Steps 5-6 of the handle tutorial on the other handle end to secure it into place.
Once you have secured both ends of your handle to the body of the basket, you can remove the pins holding the handle in place.
Abbey tying a finishing knot on the X stitches of the handle

Abbey’s basket with both handle ends stitched on
You have finished your hanging letter basket!
The pictured basket is quite small. The steps in this tutorial can be altered to create baskets either larger or smaller than the one shown here. The final step of making your basket is to fill it with things that you enjoy.

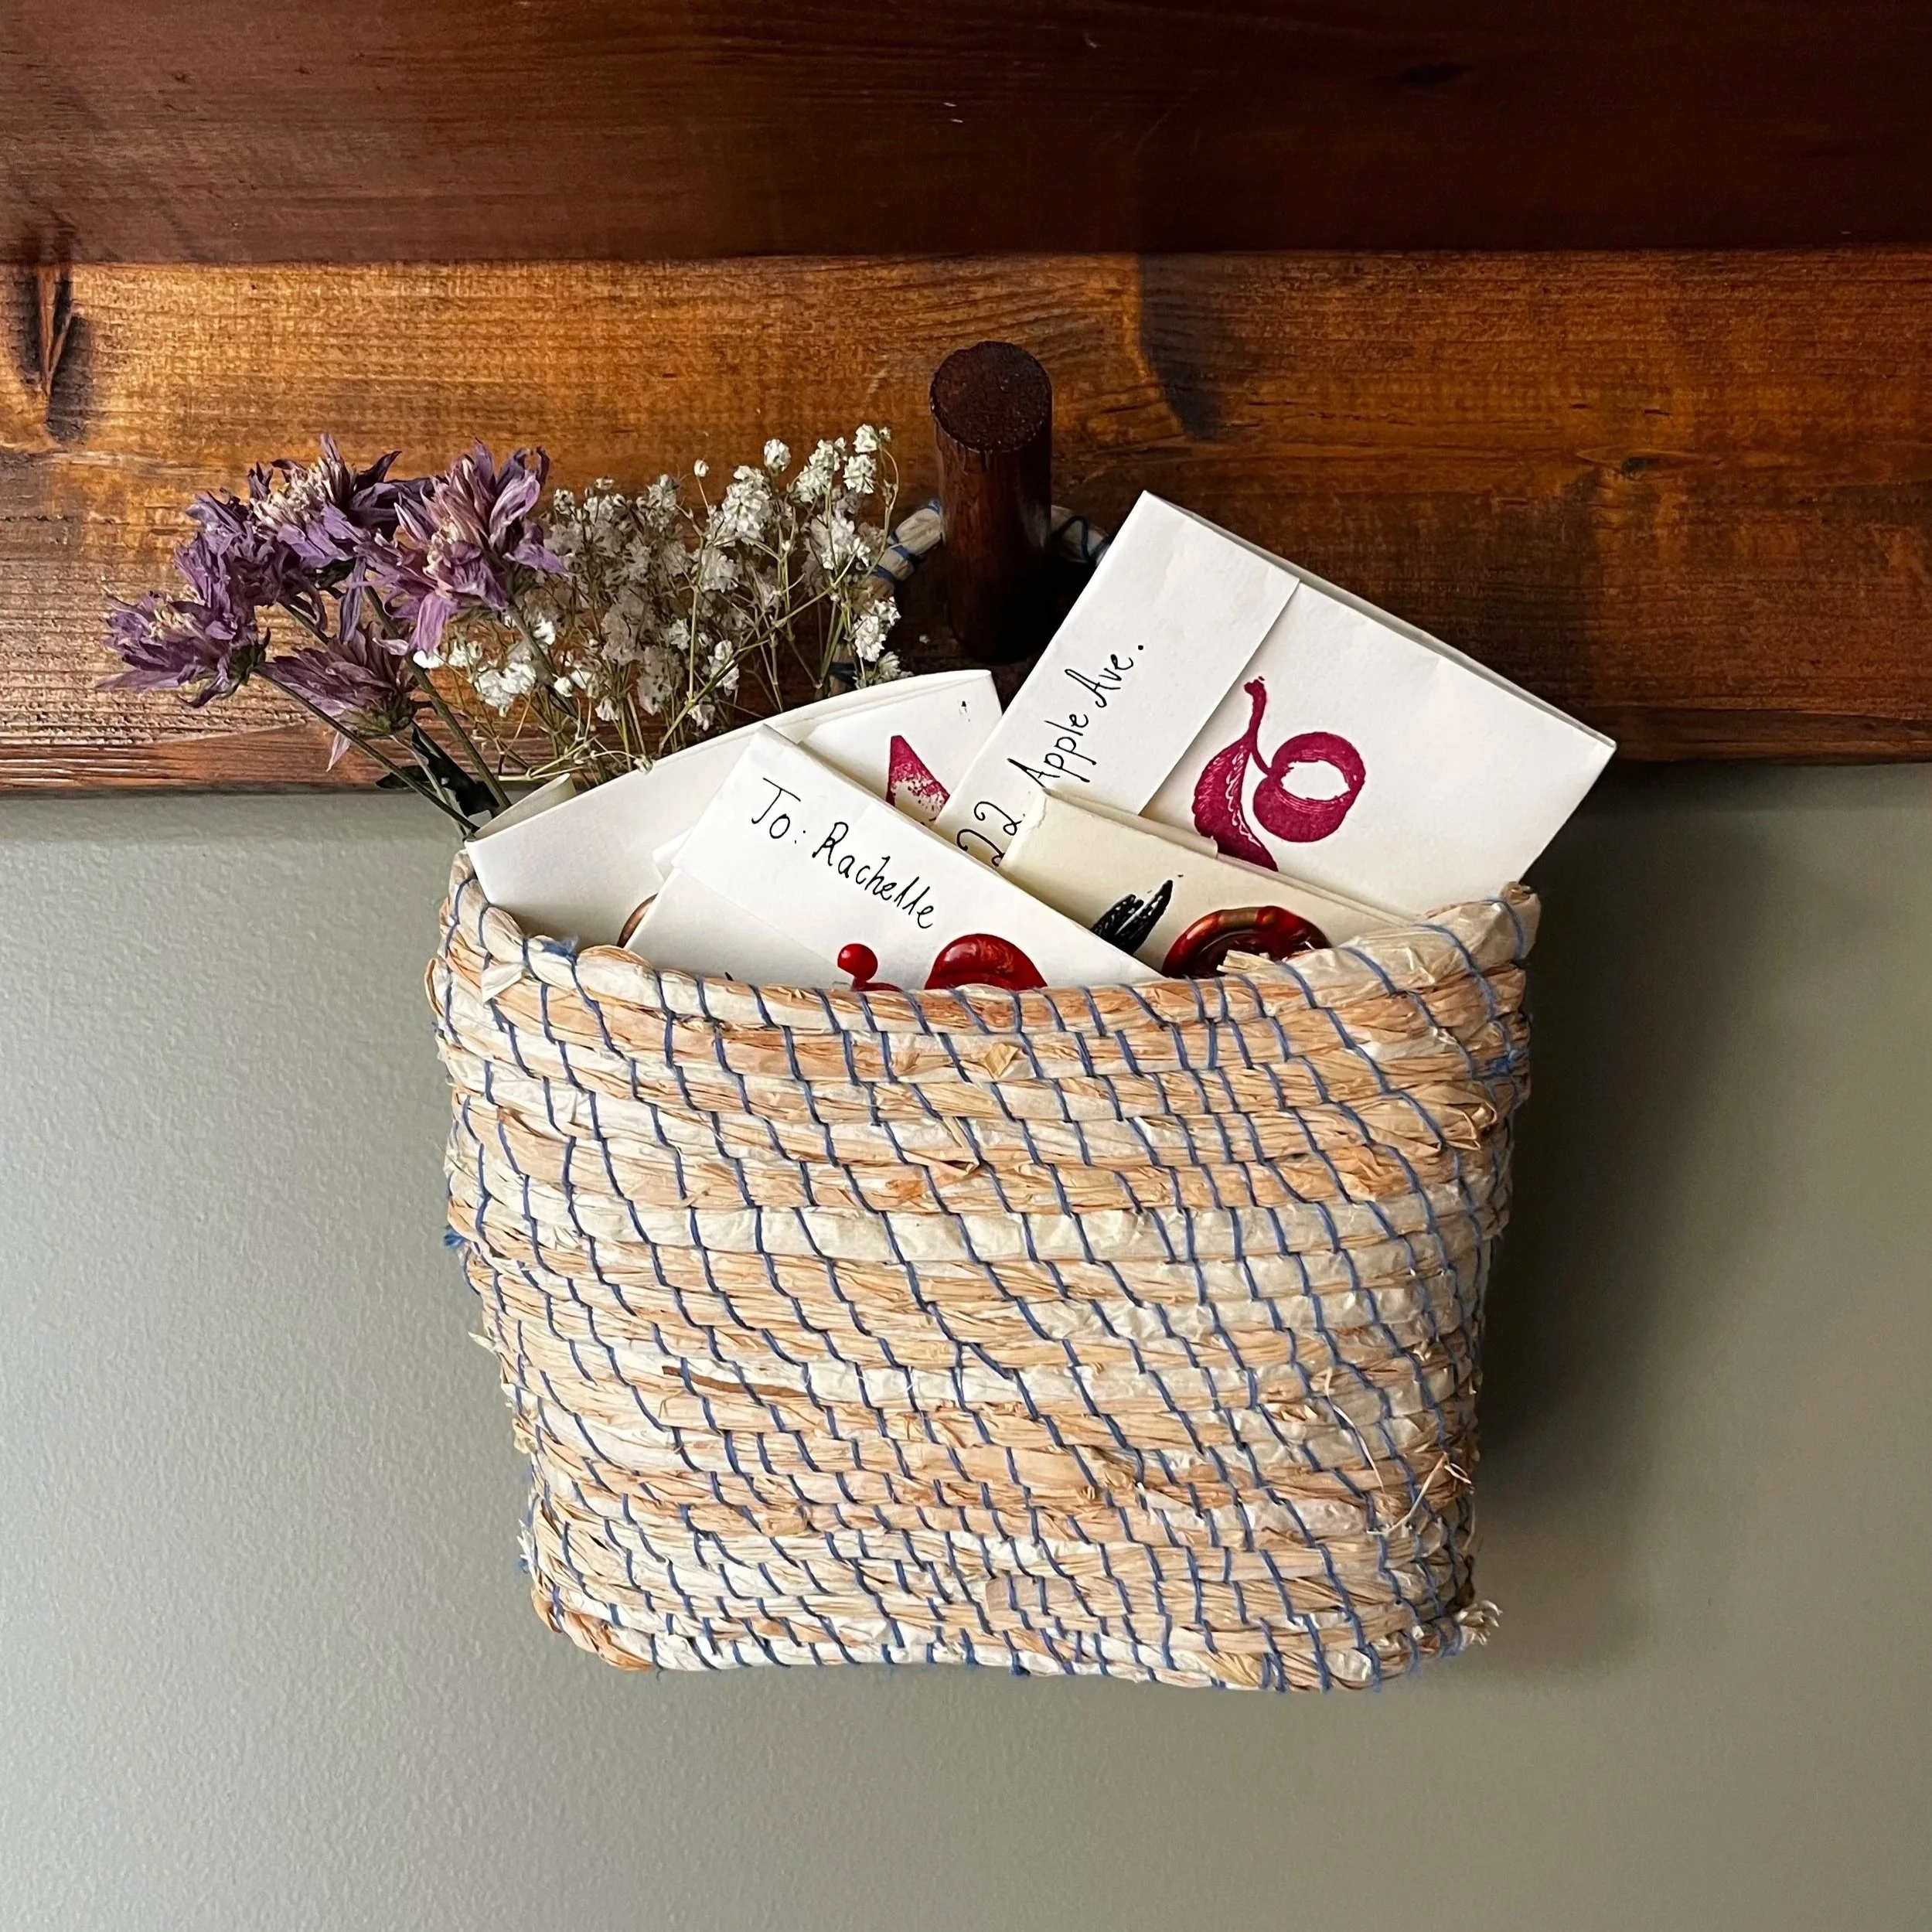
Abbey’s finished letter basket (empty) and Abbey’s finished letter basket (filled with letters)
To read a maker’s reflection by Abbey, click here.
Please share your own work-in-progress and/or finished creations! Connect with us on Instagram @crafty_victorians.
This tutorial takes inspiration from Ruby Taylor’s instructions for making a “Lidded Grass Basket.” Those instructions are included in her beautiful and informative book Wild Basketry: Making Baskets and Natural Cordage from Foraged Plants (2025).
Click here to view a list of resources used to make this tutorial.